Change audio volume in iMovie on Mac
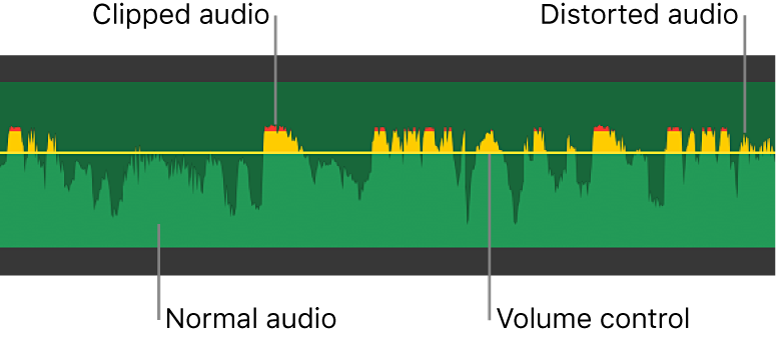
As you adjust the volume of a clip in iMovie, its audio waveform changes shape and color to reflect your adjustments. Make sure that the peak sections of the waveform don’t appear yellow, which indicates distortion, or red, which indicates clipping (severe distortion). If you see either red or yellow in your audio waveform, lower the volume until the entire waveform is green. If only part of the waveform is red or yellow and the rest is green, you can adjust the volume of that part of the waveform.

If waveforms don’t appear in the timeline, click the Settings button in the upper-right corner of the timeline and select the Show Waveforms checkbox.
Change volume in a clip in the timeline
In the iMovie app
 on your Mac, select an audio clip (or a video clip with audio) in the timeline.
Drag the volume control (the horizontal line across the audio waveform) up or down.
As you drag, the level appears as a percentage value, and the waveform changes shape to reflect your adjustments.
Change the volume of part of a clip
You can select a range in a clip and then change the volume of just that part of the clip. The black horizontal line running through an audio waveform indicates the volume of the audio clip.
In the iMovie app
 on your Mac, position the pointer over a clip in the timeline and press and hold the R key; when the pointer turns into the Range Selection pointer
  , drag across part of the clip.
In the selected range, drag the volume control (the horizontal line in the waveform) up or down.

Only the volume in the range selection is changed, and iMovie automatically adds a fade at each edge of the selection.
Mute the volume
In the iMovie app
 on your Mac, select one or more audio clips (or video clips with audio) in the timeline.
Click the Volume button to show the volume controls.

Click the Mute button
 .
.To unmute, click the Mute button again.
Adjust audio over time with keyframes
You can use keyframes to reduce the volume of part of a clip, then raise the volume over time. Keyframes are markers that you can add at specific points in a clip to change the volume at those points. The black horizontal line running through an audio waveform indicates the relative volume of the audio clip.
In the iMovie app
 on your Mac, select a clip in the timeline that contains audio you want to adjust over time.
In the waveform portion of the clip, move the pointer to the volume control (the horizontal line) at a point where you want to add a keyframe.
To add a keyframe, press and hold the Option key and click the volume control.
When you press and hold the Option key and the pointer is near the volume control, the pointer changes to the Add Keyframe pointer. You can click to add as many keyframes as you want to the clip.

Note: You must add at least two keyframes to your clip in order to adjust the audio over time, because any volume adjustments are made between two keyframes.
After you add at least two keyframes, do any of the following:
Set the volume of the clip at a keyframe: Drag the keyframe up or down.
Set the volume of the clip between two keyframes: Drag the volume control between the keyframes up or down.
To delete a keyframe, Control-click a keyframe in a clip in the timeline, and choose Delete Keyframe from the shortcut menu.

