Apple Watch User Guide
- Welcome
- Your Apple Watch
- What’s new
-
- Get started
- Apple Watch gestures
- Set up and pair your Apple Watch with iPhone
- The Apple Watch app
- Charge Apple Watch
- Turn on and wake Apple Watch
- Lock or unlock Apple Watch
- Change language and orientation on Apple Watch
- Remove, change, and fasten Apple Watch bands
- Stay fit with Apple Watch
- Track important health information with Apple Watch
- Stay connected with Apple Watch
-
- Apps on Apple Watch
- Open apps
- Organize apps
- Get more apps
- Tell time
- Status icons
- Control Center
- Use Focus
- Adjust brightness, text size, sounds, and haptics
- See and respond to notifications
- Change notification settings
- Manage your Apple ID
- Use shortcuts
- Create an emergency Medical ID
- Manage fall detection
- Set up Handwashing
- Connect Apple Watch to a Wi-Fi network
- Connect to Bluetooth headphones or speakers
- Hand off tasks from Apple Watch
- Unlock your Mac with Apple Watch
- Unlock iPhone with Apple Watch
- Use Apple Watch without its paired iPhone
- Use your Apple Watch with a cellular network
-
- All about Apple Fitness+
- Subscribe to Apple Fitness+
- Set up Apple Fitness+ on Apple TV
- Browse Fitness+ workouts and Meditations
- Start a Fitness+ workout
- Pause and resume a Fitness+ workout
- End and review a Fitness+ workout
- Work out together using SharePlay
- Change what’s on the screen during a Fitness+ workout
- Download a Fitness+ workout
-
- Alarms
- Blood Oxygen
- Calculator
- Calendar
- Camera Remote
- Compass
- Contacts
- Cycle Tracking
- ECG
- Heart Rate
- Memoji
- News
- Now Playing
- Reminders
- Sleep
- Stocks
- Stopwatch
- Timers
- Tips
- Voice Memos
- Walkie-Talkie
-
- About Wallet
- Apple Pay
- Set up Apple Pay
- Make purchases
- Send, receive, and request money with Apple Watch (U.S. only)
- Manage Apple Cash (U.S. only)
- Use Wallet for passes
- Use rewards cards
- Pay with Apple Watch on Mac
- Ride transit
- Use your driver’s license or state ID
- Use digital keys
- Use COVID-19 vaccination cards
- Weather
- World Clock
- Copyright
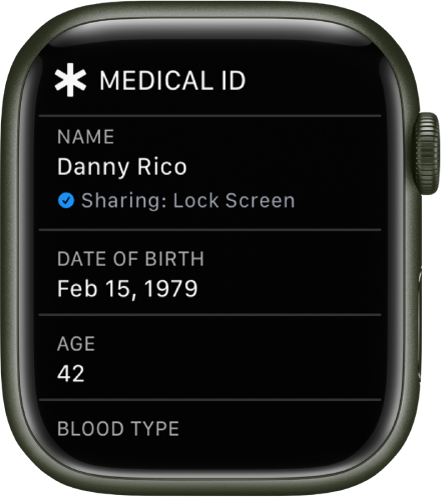
Create an emergency Medical ID
A Medical ID provides information about you that may be important in an emergency, like allergies and medical conditions. Your Apple Watch can display this information so that it’s available for someone attending to you in an emergency.
Tip: Having an emergency Medical ID that includes your date of birth is particularly important for those who are 55 and older. Apple Watch SE and Apple Watch Series 4 and later include fall detection, which is turned on if you are 55 and older (and can also be turned on for those who are 18 years and older).
Set up your Medical ID
Open the Health app on your iPhone.
Tap your profile picture at the top right, then tap Medical ID.
Tap Get Started, then enter your information.
View your Medical ID on Apple Watch

On your Apple Watch, hold the side button until the sliders appear.
Drag the Medical ID slider to the right.
If you don’t see your Medical ID when you hold the side button on your Apple Watch, open the Apple Watch app on your iPhone, tap My Watch, tap Health, tap Medical ID, tap Edit, then turn on Show When Locked. To hide your Medical ID when your Apple Watch is locked, turn off Show When Locked.
Tip: Add emergency contacts to your Medical ID, and your Apple Watch alerts them if it makes an Emergency SOS call to emergency services. See Make an emergency phone call on Apple Watch.
Download this guide: Apple Books | PDF
