Create custom Smart Lists in Reminders on Mac
In Reminders on Mac, you can create custom Smart Lists, which provide another way to view your reminders. Smart Lists gather reminders from all your lists based on criteria you choose—such as tags, date, time, priority, flag, or location. When you select your custom Smart List in the sidebar, reminders that match its criteria are shown. The reminders themselves remain in their original lists.
You can create a Smart List when you create a new list. You can also convert a regular list to a Smart List, or create a Smart List from a tag.

Create a custom Smart List
In the Reminders app
 on your Mac, click the Add List button
  in the lower-left corner of the sidebar.
Note: If you have multiple reminder accounts listed in the sidebar, select a list under your iCloud account before you click Add List.
Enter a name for your new reminder list.
Click a color swatch to choose a color for the list.
Do one of the following to choose a list icon:
Use a Reminders icon: Click the Reminders Icon button, then click an icon.
Use an emoji: Click the emoji Icon button
 , then click an emoji.
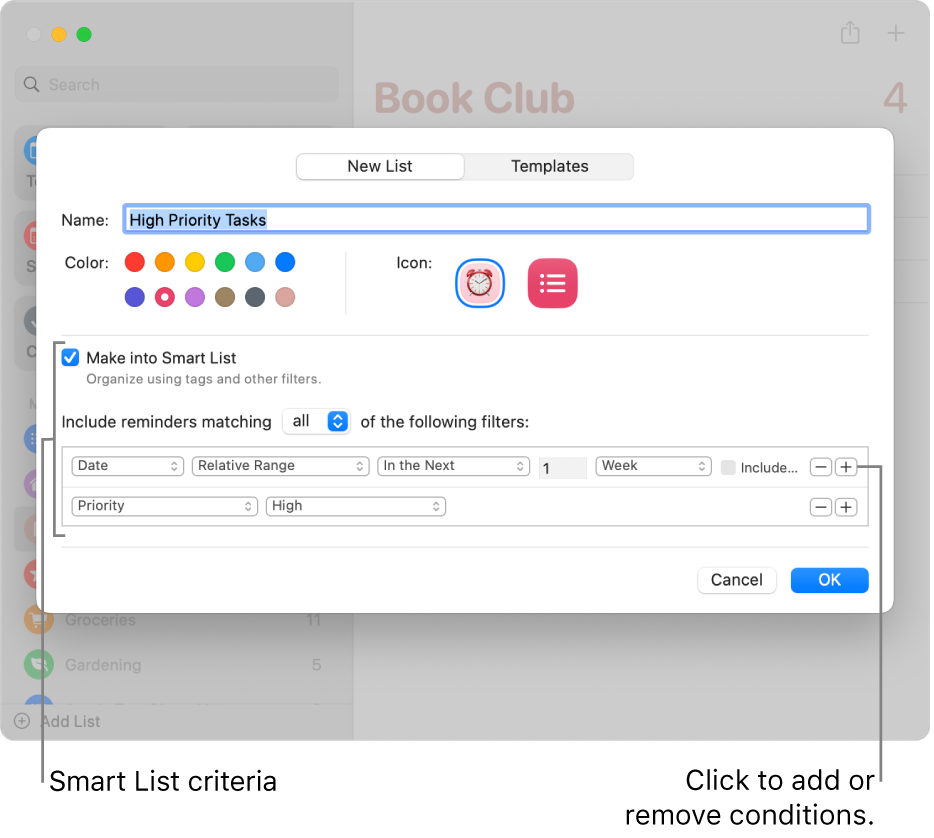
Select the Make into Smart List checkbox.
Specify the criteria.
Choose how reminders are selected: Click the “Include reminders matching” pop-up menu, then choose “all” or “any.” If you choose “all,” a reminder must match all the filters to be included in the custom Smart List. If you choose “any,” a reminder only needs to match at least one of the filters.
Set up the first filter: Click the first pop-up menu, choose an option (Tags, Date, Time, Priority, Flagged, Location, or Lists), then complete the filter using the other menus or fields shown (they vary depending on your choice in the first pop-up menu).
For example, if you choose Date, you can choose among several options in the second pop-up menu (such as Today, After a Date, Specified Range, or Relative Range). If you choose Specified Range in the second pop-up menu, click the dates that appear to enter start and end dates. If you choose Relative Range in the second pop-up menu, choose In the Next or In the Past in the third pop-up menu, enter a number in the next field, choose a unit of time in the last pop-up menu, and, if you want, select the Include Past Due checkbox.
Add or remove filters: To set additional filters, click the Add button


Click OK.
Custom Smart Lists created using macOS 13 or later that use certain filters can’t be viewed on devices with macOS 12 or earlier, iOS 15 or earlier, or iPadOS 15 or earlier. For more information, see About Reminders Smart List filters.
Convert a regular list to a custom Smart List
In the Reminders app
 on your Mac, select the list you want to convert in the sidebar.
Choose File > Convert to Smart List.
Click Convert.
Keep the following in mind when you convert a list:
The existing reminders in the list are tagged with the name of the new Smart List and moved to the default reminder list.
If the list you’re converting has subtasks, the subtasks are moved to the top level of the default reminder list and are no longer related to the parent task.
You can’t convert a shared list to a Smart List.
You can’t convert the default reminder list to a Smart List.
Create a custom Smart List from a tag
After you create one or more tags, you can use them to create new custom Smart Lists.
In the Reminders app
 on your Mac, scroll to the bottom of the sidebar, then select the tags you want to use as the basis of the Smart List.
Click once to include a tag, click again to exclude a tag. Excluded tags are crossed out.
Click the pop-up menu at the top of the Tags section, then choose one of the following:
All Selected: Include reminders that are tagged with all the selected tags.
Any Selected: Include reminders that are tagged with at least one of the selected tags.
Choose File > Create Smart List.
Enter a name for the new list, then press Return.
The new Smart List is named after the tag it was created from, and each reminder added to the list is tagged.
To learn more about Smart Lists, choose Help > Creating Smart Lists.
