Install memory in your 27-inch iMac
You can replace memory in the 27-inch iMac by following the instructions in this section.
Important: The memory in the 24-inch iMac is not user-replaceable. The memory in the 21.5-inch iMac is not user-replaceable and can only be upgraded by an Apple authorized service provider. The 21.5-inch iMac can have a maximum of 32 GB (gigabytes) of memory installed. Do not attempt to open your 21.5-inch iMac to replace or upgrade its memory.
WARNING: Apple recommends that you have an Apple-certified technician install memory. Go to Mac resources, service, and support for information about how to contact Apple for service. If you attempt to install memory and damage your equipment, that damage isn’t covered by the limited warranty on your iMac.
The 27-inch iMac has four memory slots and comes with at least 8 GB of 2666 MHz DDR4 memory installed as two or more memory modules. You can install additional memory in the free slots or replace the memory in the filled slots with 4 GB, 8 GB, 16 GB, or 32 GB memory modules, for up to 128 GB of memory. For best performance, use memory modules with close capacities. For example, you’ll get better performance using two 8 GB and two 16 GB modules compared to two 8 GB and two 32 GB modules.
Use Small Outline Dual Inline Memory Modules (SO-DIMM) that meet the following specifications:
PC4-21333
Unbuffered and nonparity
260-pin 2666 MHz DDR4 SDRAM
You can purchase additional memory from apple.com or an Apple Authorized Reseller. For best performance, all memory should be from the same vendor.
For information about memory in other iMac models, see the Apple Support article Install memory in an iMac.
WARNING: Always shut down your iMac and remove the power cord before installing memory. Do not attempt to install memory while your iMac is plugged in. If you’ve been using your iMac, wait ten minutes after shutdown to let the internal components cool before continuing.
Install memory in your 27-inch iMac
Turn off your iMac by choosing Apple menu
 > Shut Down.
Disconnect all cables and the power cord from your iMac.
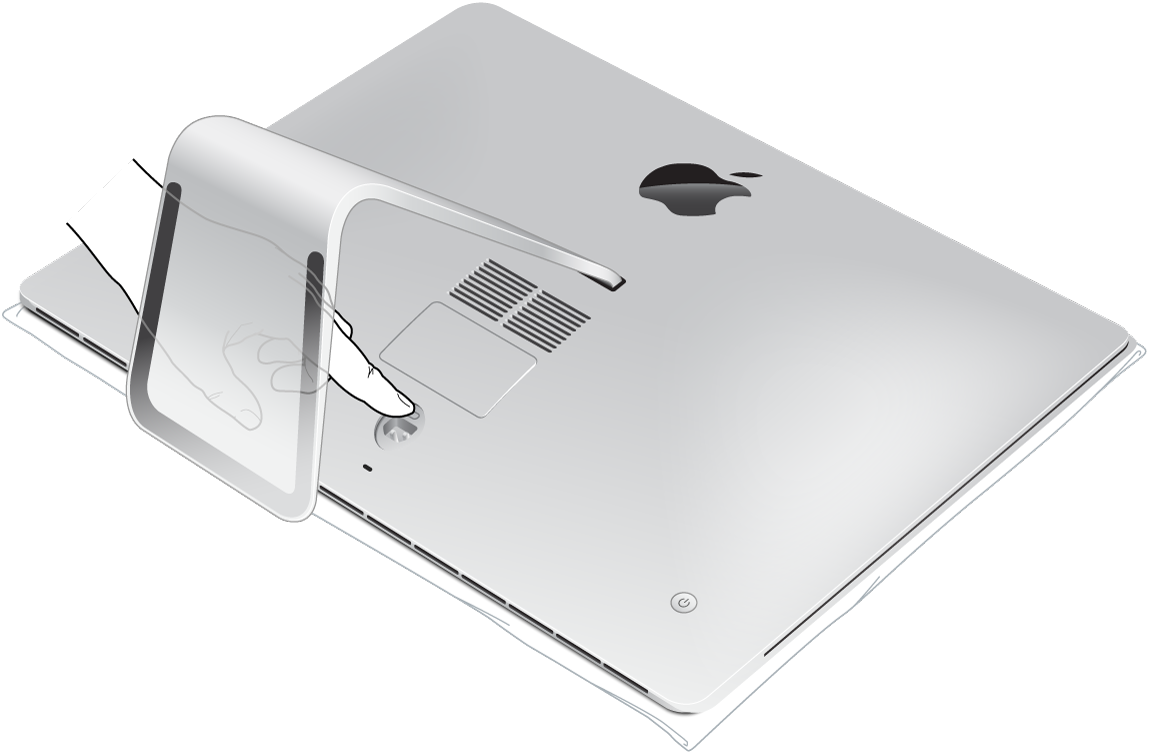
Place a soft, clean towel or cloth on your work surface. Hold the sides of your iMac and lay it down so that the screen rests on the surface and the bottom faces you.
Open the memory compartment door by pressing the small gray button located just above the AC power port.

The memory compartment door opens as the button is pushed in.

Remove the memory compartment door and set it aside.
A diagram on the bottom of the door shows the orientation of the memory modules and the memory cage levers.
Locate the levers on the sides of the memory cage. Push the levers outward to release the cage.

Pull the levers toward you to give you access to the memory module slots.
Remove a memory module—handle it carefully by its edges and pull it straight up and out.

With the notch on the bottom and toward the right side, replace or install a memory module by inserting it into the slot. Press firmly and evenly until you feel a slight click.
Note: If using both slots in a channel, install memory with the same capacity.

After you’ve installed all the memory modules, push the memory cage levers down into the compartment until they click back into place.

Replace the memory compartment door, then press it firmly.
Hold your iMac by its sides and return it to a standing position. Reconnect the cables and power cord.
Press the power button on the back of your iMac to turn it on.
Note: Your iMac performs a memory initialization procedure when you first turn it on after upgrading memory or rearranging DIMMs. This process can take 30 seconds or more, and the display of your iMac remains dark until it’s finished. Make sure to let the memory initialization complete.
